AI Photo Enhancer & AI Studio
- 365.00
- 4.2
- Installs
- 1.00M
- Price
- Free
Screenshots


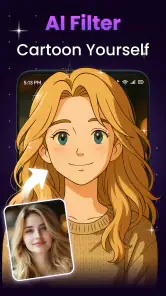
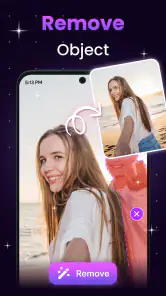


Analysis by Reviewed
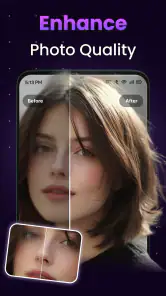
I approached AI Photo Enhancer & AI Studio as a practical photography tool rather than a magic repair button. Its purpose is easy to understand: take an old, blurry, pixelated, noisy, or otherwise weak image and try to make it look cleaner. In my testing mindset, that makes it most interesting for everyday photo rescue—pictures copied from messaging apps, family snapshots, scans, and images that look fine as tiny thumbnails but fall apart when enlarged.
The app comes from Zetfun Studio and is available free of charge, with optional purchases listed from $1.99 to $59.99 per item. It is rated for Everyone, which fits the straightforward editing concept. The current release is 3.8.229 and works on Android 8.0 or later. Those details matter because an enhancement tool is only useful if it runs comfortably on the phone you actually use and does not turn a simple repair into a confusing editing project.
Where the experience usually gets stuck
The first difficulty is deciding what “better” should mean for a particular photograph. A soft portrait, a heavily compressed screenshot, and a faded scan do not have the same problem. An AI enhancer can estimate missing detail, but it cannot recover information that was never captured. If the original face is only a few blurry pixels, the result may look sharper while still being an interpretation rather than a faithful restoration.
I would therefore begin with a copy of the original and keep the untouched file somewhere safe. This is especially important with sentimental pictures. A processed image can look more impressive at first glance, yet small details around hair, glasses, text, or patterned clothing may change in ways that are easy to miss until the picture is viewed larger.
Another common sticking point is choosing the wrong source image. If you have several versions of the same photo, use the largest original file rather than a screenshot of a preview. A picture downloaded repeatedly through chat apps may already contain compression damage, and sending that version through an enhancer can emphasize blocky edges instead of restoring natural detail.
In my experience, the best candidates are images with a recognizable subject and a clear reason for looking weak. A slightly soft family portrait, an old printed photograph captured with a phone, or a low-resolution picture that needs to be shared again gives the app something useful to work with. Extremely dark images, motion-blurred shots, and tiny crops are much harder cases.
The most useful rule is to judge the result at the size where you will actually use it. If the image is intended for a profile picture, inspect it as a small square. If you plan to print or frame it, check the full-size version and look closely at faces, lettering, and straight lines. A dramatic improvement when zoomed out can hide artificial textures when viewed at normal size.
Why an apparently failed result may still be useful
Sometimes the app seems to do very little because the source is already reasonably clean. Enhancement is not the same as applying a strong visual filter. On a modern, well-lit photo, a restrained change may be preferable to an aggressive one. I would not treat a subtle result as a failure without comparing both versions side by side.
The opposite problem is an image that looks overprocessed. Fine skin texture can become unnaturally smooth, printed letters can acquire strange edges, and repeated patterns may appear invented. When that happens, I would return to the original, choose a less damaged source, and avoid judging the image only by its sharpness. Natural-looking detail is more valuable than maximum crispness.
Setup checks before editing
Before starting, I would make sure the phone meets the app’s Android requirement of version 8.0 or newer. I would also keep the original image accessible in the device’s normal photo storage and confirm that the chosen file opens correctly outside the app. This simple check separates a damaged or incomplete source file from an issue inside the editor.
It is worth preparing a small test image first instead of beginning with a whole folder of important photographs. Pick one representative picture, run the enhancement, and inspect the output. That gives you a quick sense of whether the style suits your material before spending time on a larger restoration session.
I would also allow enough free storage for both the source and the edited copy. The exact space needed depends on the image, but keeping only one copy of a valuable photograph is poor practice. If the phone is nearly full, save or move older originals before processing a batch of images.
The free installation makes it easy to try the basic experience without committing money immediately. However, the presence of in-app purchases means I would read each purchase screen carefully before confirming anything. The listed individual purchase range is broad, from $1.99 to $59.99, so a reader should pay attention to the exact option displayed rather than assuming every tool or export is covered by the same arrangement.
That is also why I would test one or two representative images before deciding whether the app fits a regular workflow. If your goal is occasional family-photo cleanup, a free trial of the process may be enough. If you plan to restore a large archive, the cost structure becomes a more important part of the decision than the novelty of the enhancement itself.
A sensible first pass
I like to use a three-step check. First, identify the main defect: blur, noise, visible pixels, or general softness. Second, process one image and compare it with the original without zooming in excessively. Third, inspect the areas that matter most, such as eyes, small text, jewelry, tree branches, and photo borders.
This approach prevents a common mistake: choosing an output because it looks sharper everywhere, even though the subject has become less accurate. For a portrait, facial proportions and eyes deserve more attention than a crisp background. For a document-like image, letters and lines matter more than attractive smoothing around the page.
If the app’s result is suitable, I would save it as a new version and keep the original. Naming files by subject and edit stage can help when comparing several attempts. Even a simple distinction between “original” and “enhanced” avoids accidentally replacing the only untouched copy.
Recovering when a workflow goes wrong
When an edit does not appear to complete, I would first repeat the operation with a smaller, ordinary image. This is a safe troubleshooting step because it tells you whether the difficulty is tied to one particular file or to the general workflow. If the smaller test works, the original may be unusually large, damaged, or difficult to interpret.
If the result looks strange, I would not immediately process the same output again. Repeated enhancement can compound invented edges and noise. Go back to the untouched original and make one controlled attempt. Comparing a fresh output with the first result is much more informative than stacking several generations of edits.
A photo that opens in the gallery but behaves oddly in an editor may still contain an unusual encoding or incomplete metadata. In that situation, creating a fresh copy through the phone’s standard photo tools can sometimes provide a cleaner input. I would use that only as a practical file-handling step, not as a way to disguise a poor-quality original.
If the app closes or becomes unresponsive, I would restart the app and try a single image rather than a sequence. I would also close unrelated apps and check that the phone is not critically low on storage. These are general device checks, but they are particularly relevant to image work because processing can be heavier than simply viewing a picture.
For a result that saves but cannot be found, I would inspect the phone’s normal photo or file locations and look for a recently created copy. Avoid repeatedly tapping the processing command while searching, since that can create confusion about which version is the final one. A clear naming habit and one edit at a time make recovery much easier.
Handling difficult originals
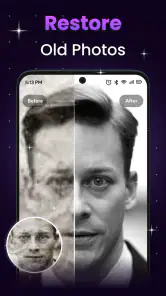
Old printed photos deserve a careful workflow. If you photograph a print under uneven light, glare and reflections may be mistaken for texture or noise. I would capture the print as evenly as possible, keep the phone parallel to it, and crop only after obtaining a clean source. The enhancer can work on the captured image, but it cannot reliably remove every reflection that obscures the original.
For screenshots, I would locate the original picture whenever possible. A screenshot may include interface elements, scaling artifacts, and another layer of compression. Enhancing it can make the text or subject appear more defined, but it may also sharpen the unwanted borders and icons. Cropping to the meaningful content before editing can produce a more useful result.
For motion blur, expectations should be modest. Sharpening can improve the impression of definition, but it does not recreate a face that moved during exposure. If the photograph is important, I would preserve the enhanced version as a presentation copy while treating the original as the more honest record.
When the app is not the cause
Not every disappointing image points to a problem with the software. The camera may have focused on the background, the lens may have been dirty, or the scene may have been too dark. In those cases, an enhancer has limited material to work with. It can make edges more prominent, but stronger edges are not automatically recovered detail.
Display settings can also mislead you. A photo may look harsh on one phone and acceptable on another because of screen brightness, sharpness, or color rendering. I would compare the original and edited versions on the same display first, then check the file elsewhere if the decision matters.
Sharing services are another source of confusion. If an edited picture looks good in the app but soft after sending it through a messaging platform, the service may have compressed it. Keep the saved result and use the platform’s option for sending the original-quality file when that is available. Otherwise, you may blame the enhancer for a change that happened later.
This is where the app compares interestingly with the usual alternatives. A conventional photo editor gives you more direct control over brightness, contrast, cropping, color, and sharpening. That is better when you understand the defect and want predictable adjustments. AI Photo Enhancer & AI Studio is more appealing when you want a quick attempt at reconstructing apparent detail without manually tuning several sliders.
Dedicated desktop restoration software remains the stronger choice for a serious archive, especially when you need careful retouching, precise masking, color correction, or repeatable settings across many photographs. A standard mobile editor is often better for a simple crop or exposure correction. I see this app occupying the middle ground: faster and more automated than detailed manual editing, but not a replacement for professional restoration work.
It is also not the right choice if your main interest is creative composition. Someone looking for layers, illustration tools, advanced color grading, or exact control over every pixel may feel restricted by an enhancement-first workflow. The app’s appeal is strongest when the starting image is the problem and the user wants a practical improvement rather than a complete design environment.
Who will get the most from it
I would recommend trying it if you have a collection of family pictures that are recognizable but soft, old images that need a cleaner digital copy, or low-quality photos that you want to use in a small online profile. Its Everyone rating and free entry point make it approachable for casual users, while the 1M+ install milestone and 4.2 average from around 17K ratings suggest that many people have found the basic idea useful.
A realistic example would be finding an old birthday photograph in a relative’s chat history. I would ask for the largest version available, save it separately, process one copy, and inspect the face and background at normal viewing size. If the eyes become clearer without looking painted, I would keep the enhanced copy for sharing while retaining the original as an archive file.
I would be more cautious about recommending it to photographers who need faithful evidence, exact text recovery, or consistent professional output. The more important the image, the more carefully you should compare it with the source. AI-based reconstruction can make a picture more pleasing, but pleasing and accurate are not always the same thing.
My practical verdict
After looking at the app through a real-use workflow, I think its value comes from convenience rather than unlimited control. It gives ordinary phone users a focused way to attempt photo cleanup without learning a full editing suite. That is a meaningful advantage when the alternative is leaving a treasured but weak image untouched.
The best results will come from good preparation: start with the largest original, preserve the untouched file, test one representative image, and judge faces, text, and fine patterns instead of sharpness alone. If the workflow stalls, isolate the file, reduce the workload, and check storage and the source image before assuming the app is broken.
There are clear boundaries. Severe blur, glare, darkness, and repeated compression cannot be reliably reversed, and an aggressive-looking result may contain details that were estimated rather than recovered. Users who need manual precision should choose a conventional editor or desktop restoration tool instead.
For everyone else, the free starting point makes experimentation reasonable. I would treat purchases as a decision to make only after seeing how the app handles your own photographs, especially because individual in-app options range from $1.99 to $59.99. Used with realistic expectations, this is a handy first rescue step for imperfect personal photos, not a substitute for the original image or a professional restoration workflow.
Pros
- Sharpens blurry photos with a simple
- beginner-friendly workflow.
- Useful tools for restoring old
- faded
- or low-resolution pictures.
- AI effects can create polished social media-ready images quickly.
- Batch-style editing options can save time on repetitive enhancements.
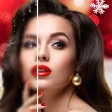
- Preview comparisons make it easy to judge changes before saving.
Cons
- Results may look overly smooth or artificial on some faces.
- High-resolution exports may require a subscription or extra payment.
- Processing can take longer when enhancing detailed or large images.
- Some features may depend on an internet connection and server processing.
- Ads or upgrade prompts can interrupt the editing experience.

- Category
- Photography
- Version
- 3.8.229