Luma Dream Machine
- 31.00
- 3.3
- Installs
- 10.00K
- Price
- Free
Screenshots
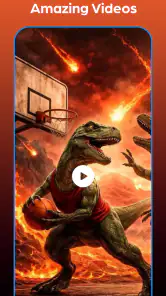
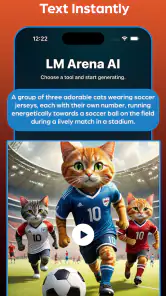
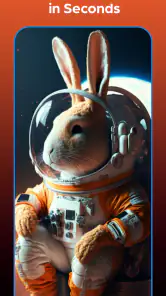
Analysis by Reviewed
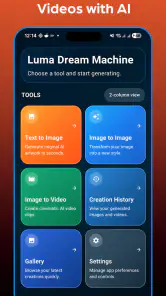
Creating an image or short visual idea with artificial intelligence can sound simple, but the first attempt often feels less predictable than expected. Luma Dream Machine brings several creative modes into one personalization app from Infinity AI Solutions: text-to-image, image-to-image, and AI video generation. I found that combination useful because it lets me move from a rough idea to a more developed visual without immediately switching between several separate tools.
My overall impression is mixed but positive. The app is approachable for experimenting, especially if you want to turn a written concept into something visual without learning a traditional editing program. At the same time, it is not a replacement for a full image editor, a professional video suite, or a carefully controlled design workflow. The results depend heavily on how clearly you describe what you want, and the process can involve some trial and error.
It is free to install and suitable for Everyone, although in-app purchases range from $5.99 to $59.99 per item. That matters because casual experimentation and regular creation are very different experiences. I would begin with the free access, learn how the app behaves, and only then decide whether paying makes sense for the way I work.
What to expect before creating anything
The app sits in the personalization category, but I would think of it more as a compact creative laboratory. Its main appeal is not simply producing one attractive picture. The useful part is being able to test an idea in several directions: write a prompt for a new image, provide an existing image as a starting point, or explore motion through AI video generation.
That range makes it suitable for small personal projects. I could imagine using it to sketch a mood for a room makeover, prepare a visual reference for a social post, develop a character concept, or turn a travel memory into a stylized scene. It is also handy when I have the general idea in my head but lack the drawing ability or patience to build the first draft manually.
However, I would not approach it expecting every result to be ready for publication. AI-generated visuals can miss small details, misunderstand relationships between objects, or produce a style that looks different from what the wording suggested. The first output is best treated as a direction, not a final answer. That mindset makes the app much less frustrating.
The current version is 12, and the minimum requirement is Android 7.0. On the audience side, the listing shows an average rating of 3.3 from around 89 ratings, with 31 written reviews and over 10K installs. Those figures suggest a modest user base rather than a universally polished mainstream tool, so I would keep expectations practical: this is an app to explore, not one I would choose solely because of its popularity.
More From Our News Desk
Clash of Clans Is Won Between the Battles
Android Auto Makes the Case for Quieter Car Software

MobiOffice: Transforming Mobile Productivity with Seamless Integration

EA SPORTS FC™ Mobile Soccer: Redefining Mobile Sports Gaming

How Microsoft OneDrive Became a Mobile Productivity Giant
How Google Translate Breaks Language Barriers Effortlessly
The short label “Luma Dream Machine” gives a good sense of its creative direction, but it does not explain the most important decision a beginner has to make: which mode should come first? In my experience, text-to-image is the easiest starting point because it removes the need to prepare a source file. Image-to-image becomes more useful once you already have a photo, sketch, or reference worth transforming. Video generation is the most exciting option, but also the one I would approach with the most patience.
Choosing the right mode for your goal
If you only want to see an idea quickly, start with text-to-image. Describe the subject, setting, atmosphere, and visual style in a single clear request. For example, instead of writing “a nice café,” I would specify a small corner café at sunrise, warm window light, wooden tables, and a quiet illustrated look. The extra context gives the system more useful direction without requiring technical vocabulary.
Image-to-image is better when composition matters. Suppose I have a rough phone sketch of a desk layout or a photo of a plain wall. Using that source can help preserve the general arrangement while letting the app reinterpret the appearance. The trade-off is that the original image may influence the result more strongly than expected, so I would not assume that a short prompt can completely replace the source.
Video generation is the mode I would reserve for a clear visual experiment. It can be tempting to describe an entire story in one request, but a complicated sequence gives the system too many relationships to manage at once. A single subject performing one visible action is a more sensible first attempt. This is one of the app’s less obvious lessons: simple motion usually gives you a better starting point than an ambitious scene.
What the free starting point means
The free price makes the app easy to try, but it does not automatically make it the best long-term choice for every creator. If you only need an occasional concept image, paying for a larger package may not be worthwhile. If you plan to generate repeatedly, the purchase range becomes an important part of the decision, and I would compare the value against the editing tools or AI services you already use.
I also recommend keeping a small note of prompts that produce useful results. That habit is more valuable than simply pressing generate again and again. Record the wording, the type of source image, and what you changed between attempts. Over time, you will learn whether the app responds better to descriptions of lighting, camera viewpoint, materials, mood, or action. This turns random experimentation into a repeatable workflow.
Getting through setup and reaching a useful first result
After installing the app, I would begin by deciding what I want to make before exploring every option. A first-time user can easily spend too long browsing modes without completing anything. Pick one small target: a poster background, a fantasy landscape, a visual for a message, or a short motion test. The narrower the target, the easier it is to judge whether the output is useful.
Because the app supports more than one type of generation, the first setup experience is best handled as a quick orientation rather than a deep configuration session. Look for the creation mode that matches your starting material. With no image ready, text-to-image is the least complicated path. With a photo or sketch already available, image-to-image may save time. For motion, prepare a prompt that describes one subject and one action.
I would not begin by trying to reproduce a famous character, a detailed group scene, or a complex product advertisement. Those requests create too many opportunities for visual errors, and a disappointing first result can make the app seem worse than it is. A controlled test tells you more about the tool’s strengths than an overloaded prompt.
A practical first text-to-image workflow
My recommended first attempt has four parts: subject, environment, lighting, and style. For example, I might describe a small orange cat sitting beside a rain-covered window, soft evening light, and a hand-painted storybook appearance. This is specific enough to guide the result while still leaving room for interpretation.
Once the image appears, I would inspect it for the details that matter to my purpose. Is the subject clearly visible? Is the composition usable? Does the mood match the request? If the answer is partly yes, revise only one or two elements rather than rewriting everything. Changing the entire prompt makes it difficult to understand what improved the result.
One useful technique is to separate visual priorities from decorative extras. If the cat must be positioned near the window, say that directly. If the color palette matters, mention it after the main composition. I have found that piling on adjectives can make a request sound precise while actually making the intended hierarchy unclear.
For a social image, I would generate the main visual first and add exact text later in a normal design editor. AI image tools are much less dependable when they need to render precise wording, logos, or small labels. This two-step workflow is faster than repeatedly requesting a poster that contains both a perfect illustration and perfectly spelled typography.
Using an existing image without losing control
Image-to-image is where the app can become more practical than a purely prompt-based generator. A basic sketch can communicate layout, while a photograph can provide color and perspective. I would use a source image when the arrangement is more important than inventing everything from nothing.
The key trade-off is control. A source image can anchor the result, but it can also carry unwanted details into the transformation. Before using one, crop it to the part that matters and remove distracting background elements if possible. A clean reference gives the app fewer competing signals.
This workflow is particularly useful for room concepts. I could photograph a plain shelf, ask for a warm minimalist reading corner, and use the output as inspiration rather than as an exact renovation plan. The result can help me compare moods and materials, but I would still verify dimensions and practical construction separately. The app is a visual brainstorming partner, not a measuring tool.
Trying video without making the first attempt too difficult
For a first video request, I would avoid describing several cuts or camera movements at once. Start with something like a paper boat floating across a puddle while gentle ripples spread outward. The subject, action, and environment are easy to understand, which makes the result easier to evaluate.
When the output is not convincing, identify the problem before changing the prompt. If the subject is clear but the movement is weak, simplify the action. If the movement works but the scene feels wrong, adjust the setting or lighting. This diagnostic approach is one of the most useful habits I would recommend to a new user.
I would also save promising still images before attempting motion when the workflow allows it. A strong visual concept can serve as a better starting point than a vague description, and it gives you a consistent reference for later experiments. That is a more deliberate process than treating every video request as an unrelated gamble.
Confusion points that can affect the experience
The biggest source of confusion is the difference between an attractive result and a controllable result. An image can look impressive while still failing the actual brief. For example, a beautiful room concept may ignore the required furniture arrangement, or a character image may change clothing details between attempts. I judge success by whether the output solves my particular problem, not merely by whether it looks polished at first glance.
Another common misunderstanding is assuming that more words always produce more accuracy. Long prompts can bury the important instruction. I prefer a short description with a clear order: what must appear, where it should appear, and what mood or style should guide it. Add secondary details only after the main structure is working.
It is also easy to confuse image-to-image with exact editing. If I need to remove one object while preserving every other pixel, a conventional editor is usually the better tool. If I want to reinterpret the whole scene while keeping a broad composition, this app makes more sense. Knowing that boundary prevents a lot of wasted attempts.
For video, I would be especially careful about treating generated motion as a finished production asset. A short AI clip can be useful for mood boards, concept pitches, personal experiments, or a visual transition idea. It is less suitable when continuity, exact timing, repeated characters, or precise brand presentation is essential. In those situations, a dedicated video editor or a more specialized production workflow will give me greater control.
Everyday scenario: turning a vague idea into something shareable
Imagine I am planning a birthday message for a friend who loves mountain trips. I could begin with a text-to-image request for a cozy tent overlooking a misty mountain lake at dawn, using a warm illustrated style. If the composition is close but the lake is too dominant, I would revise the placement rather than start from scratch. Then I could use the image as a background in a separate editor and add the personal greeting there.
If I wanted motion, I would create a simpler follow-up: mist moving gently across the lake while a small lantern glows near the tent. That request focuses on atmosphere instead of trying to animate every part of the scene. The result would be useful as a short personal greeting even if it were not suitable for a professional travel campaign.
This example shows where the app fits best in everyday life. It helps me cross the gap between an idea and a visual draft. It does not remove the need for taste, editing, or checking details. The person using it still decides what feels appropriate, what needs correction, and whether the final result communicates the intended message.
Who should use it and who should choose another tool
I would recommend trying it if you enjoy visual experimentation, need quick concept art, or want to explore AI video without starting with a desktop production program. It is also a reasonable option for someone who has a photo or sketch and wants to see several stylistic interpretations.
I would be more cautious if your work depends on exact typography, consistent characters, accurate product proportions, or repeatable brand layouts. In those cases, a traditional design application remains more dependable, while a specialized video editor is better for timeline control and continuity. The app can still contribute ideas, but it should not be the only tool in that workflow.
Privacy and ownership decisions also deserve ordinary common sense. I would avoid uploading sensitive personal images, confidential work, or material I am not allowed to transform unless I have checked the relevant terms and feel comfortable doing so. That is not a criticism unique to this app; it is simply a sensible boundary whenever creative material is processed by an online AI service.
My next-step workflow after the first success
Once I have one acceptable result, I would not immediately jump to the most complicated mode. I would reuse the successful idea in a controlled variation: change the lighting, move the setting, alter the art direction, or provide a different reference image. This reveals which parts of the prompt are doing the real work.
For a repeatable project, I would keep a simple folder containing the original prompt, source image, selected outputs, and notes about what failed. That makes the app much more useful for series work, such as several illustrations with a related mood. Consistency may still require manual selection and editing, but the record helps me avoid losing the best wording.
I would also decide in advance how much experimentation is worth paying for. Since the app is free to start and offers in-app purchases from $5.99 to $59.99 per item, occasional users should be careful not to buy simply because an early result was almost right. A purchase makes more sense when I have a defined project and know that repeated generation will save time or provide value.
In the end, Luma Dream Machine is most convincing as a flexible starting point for visual ideas. Infinity AI Solutions has combined text-to-image, image-to-image, and AI video generation in a way that encourages experimentation, and the free entry point makes that easy to test. My advice is to begin with a small goal, write prompts around the main visual priority, use source images when composition matters, and treat video as a focused experiment rather than a complete production system.
I would recommend it to curious creators who want to turn rough thoughts into images or motion quickly. I would skip it as a primary tool if exact control is more important than creative exploration. Used with that distinction in mind, it can be a friendly first step into AI-assisted personalization rather than a frustrating attempt to replace every other creative application.
Luma Dream Machine Frequently Asked Questions
Is Luma Dream Machine suitable for beginners?
The app brings several AI creation options together, so it may appeal to people who want to experiment with text-to-image, image-to-image, and video generation in one place. You can describe what you want to create in a prompt, then explore the generated result. As with other creative tools, clear instructions and a little trial and error can help you get closer to the result you have in mind.
What is Luma Dream Machine used for?
Luma Dream Machine is an AI-powered video generation tool that creates short video clips from text prompts and, depending on the available features, from reference images. You describe a scene, subject, movement, or visual style, and the service produces a generated sequence. It is useful for concept development, social media content, storyboarding, creative experiments, and visualizing ideas without filming everything manually.
Is Luma Dream Machine free to use?
Luma Dream Machine is free to download, with in-app purchases ranging from $5.99 to $59.99 per item. Luma Dream Machine may offer limited free access, but usage is generally controlled through credits, generation limits, queues, or other account restrictions. More frequent users may need a paid subscription or additional credits. Before downloading or signing up, check the current pricing, available plans, watermark policy, commercial-use terms, and whether unused credits expire, because these conditions can change over time.
Can Luma Dream Machine create realistic videos from text prompts?
Yes, the service is designed to generate visually detailed clips from natural-language prompts, including descriptions of people, objects, environments, camera movement, and cinematic style. Results can be impressive, but they are not always consistent. Hands, faces, text, object identity, physics, and precise actions may contain errors, so generated footage usually benefits from several prompt variations and careful selection.
Does Luma Dream Machine work on Android and iPhone?
Access to Luma Dream Machine can depend on the current version of the product and the region where you live. Some users may use it through a mobile application, while others may access the generation tools through a mobile web browser. Check the official Google Play Store, Apple App Store, or Luma website before installing anything, and avoid unofficial apps that imitate the service.
Pros
- Creates impressive cinematic videos from simple text prompts.
- Image-to-video tools add motion to uploaded artwork and photos.
- Supports creative experimentation with varied visual styles.
- Cloud-based generation works without powerful phone hardware.
- Results can be shared or exported for use in creative projects.
Cons
- Free generations are limited and may require credits for continued use.
- Complex prompts can produce inconsistent characters and details.
- Video generation may take time
- especially during busy periods.
- Generated clips are often short and need editing for longer projects.
- Some outputs may contain visual glitches or unnatural movement.
- Category
- Personalization
- Version
- 12