rackline.ai - AI Deer Scoring
- 16.00
- 3.2
- Installs
- 10.00K
- Price
- Free
Screenshots
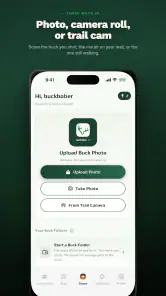
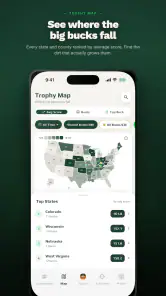
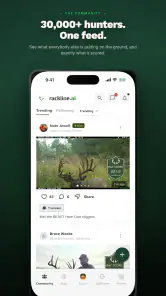
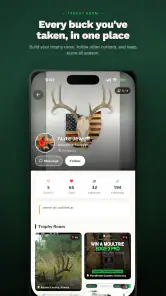
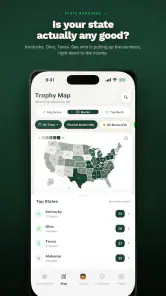
Analysis by Reviewed
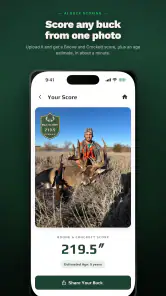
I approached rackline.ai as a practical field companion rather than a novelty camera app. Its purpose is straightforward: use a photograph of a deer antler rack to produce an estimate based on Boone & Crockett scoring. That makes it interesting for hunters, outdoor enthusiasts, and anyone who wants a quick reference before sitting down with a tape measure and scoring sheet.
My overall impression is that the app is most useful when treated as a fast first pass, not as the final authority on a trophy. It can help organize a rough assessment from a photo, but the quality of the image and the way the rack is presented matter enormously. If you understand that trade-off, the app becomes much more useful. If you expect a single picture to replace careful field measurement, you are likely to be disappointed.
How the basic photo-to-score workflow feels
The central workflow is easy to understand. You provide a photograph of an antler rack, and the app analyzes the visible structure to return a Boone & Crockett-style score estimate. That simplicity is the main attraction. Instead of immediately reaching for a tape, notebook, calculator, and reference chart, I can use the image as a starting point and decide whether a more formal scoring session is worthwhile.
The best results should come from a deliberate photograph rather than a casual snapshot. I would place the rack where both sides are visible, avoid strong shadows across the beams, and keep the camera as level as possible. A straight-on image is more useful than an angled shot that makes one side appear longer or hides points behind another tine. This is not a minor detail: the app can only judge what the camera clearly captures.
A realistic use case is a conversation after a hunt. Someone has photographed a buck and wants a quick idea of how the rack compares with an ordinary personal harvest. Instead of debating from memory, the group can use the image for an initial estimate. That does not settle an official score, but it gives the conversation a more useful direction and may show which measurements deserve closer attention.
I also found the workflow better suited to reviewing a rack at home than trying to use it in a rushed outdoor moment. A clean photograph taken after the excitement has passed gives you more control over framing. You can check whether the main beam, brows, tines, and inside spread are visible before submitting the image. That repeatable habit is more valuable than simply taking several random pictures and hoping the strongest one produces the best result.
There is an important distinction between an image-based estimate and a certified measurement. Boone & Crockett scoring involves specific measurements and deductions, while a photograph gives an automated system visual evidence from one angle. I would use the result to compare possibilities, prepare for a detailed scoring session, or satisfy curiosity. I would not use it as proof for a record-book claim, a sale, or a disagreement where precision has consequences.
More From Our News Desk

Clash of Clans Is Won Between the Battles

Android Auto Makes the Case for Quieter Car Software
MobiOffice: Transforming Mobile Productivity with Seamless Integration
EA SPORTS FC™ Mobile Soccer: Redefining Mobile Sports Gaming

How Microsoft OneDrive Became a Mobile Productivity Giant

How Google Translate Breaks Language Barriers Effortlessly
Prepare the rack before asking for an estimate
Before opening the camera, I would remove distractions from the scene. A cluttered background can make the antlers harder to distinguish, especially when the rack is dark or partially covered. Natural lighting is preferable to a bright flash that creates sharp reflections. The goal is not to make a beautiful hunting photograph; it is to make the antler outline easy to read.
Keep the rack stable and avoid presenting it at an exaggerated angle. Perspective can change the apparent relationship between the beams and the spread. A slightly elevated or rotated position may hide a point, compress the inside spread, or make one side look larger than the other. When the result seems surprising, I would first retake the picture from a more neutral position before assuming the estimate is meaningful.
One useful habit is to photograph the rack more than once with a clear purpose for each image. A centered image can show the overall shape, while a closer view may make smaller points easier to distinguish. I would not assume that more images automatically create a more accurate answer, but comparing carefully framed attempts can reveal whether the estimate is stable or highly sensitive to presentation.
This is also where the app differs from a traditional scoring kit. A tape measure gives you direct physical measurements, but it requires patience and a basic understanding of where each measurement begins and ends. The app removes much of that initial effort, yet it also removes your ability to inspect every measurement directly. The convenience is real, but it comes with less transparency.
What I would check before trusting the result
I would look at the score as a range of confidence rather than an unquestionable number. If the rack is symmetrical, well lit, and fully visible, the estimate is easier to interpret. If one antler is hidden, the photo is tilted, or the points overlap, I would consider the result tentative. The app's usefulness rises when the image quality and the physical rack are both easy to assess.
I would also compare the result with my own visual expectations. If the app produces a figure that seems far beyond what the rack's proportions suggest, that is a reason to inspect the photograph and perform manual measurements. An automated estimate can be a helpful prompt, but it should not override obvious visual evidence or a careful physical check.
Settings and habits that deserve attention
There is less value in changing things randomly than in creating a consistent capture routine. I would begin by checking the app's available camera and image options, then choose the clearest practical setup rather than the fastest one. The important setting is the one that helps preserve detail in the antlers. A high-contrast scene, poor focus, or overly compressed image can make the analysis less dependable.
I would also review the phone's basic camera behavior before using the app. Clean the lens, disable anything that causes an unwanted glare, and make sure the entire rack fits inside the frame without becoming too small. These are simple steps, but they often matter more than repeatedly submitting the same weak photograph.
Because the app is free to download, it is easy to try without committing money at the beginning. It is listed for Everyone, which fits its straightforward sports-oriented purpose. At the same time, the presence of in-app purchases ranging from around five dollars to nearly five hundred dollars per item means I would pay attention to any purchase screen before confirming anything. I would first understand what a paid option does and whether it is genuinely useful for my situation.
That pricing range is especially relevant for casual users. Someone who only wants a rough estimate after an occasional hunt may have no reason to spend heavily inside the app. A frequent user, outfitter, or serious scorer may evaluate the paid choices differently, but I would still avoid assuming that a purchase automatically turns a photograph into an official measurement. The underlying limitation of image perspective remains.
The current version is 3.0.28, and the app supports Android devices beginning with version 7.0. That makes it accessible to people using older compatible phones, although camera quality can vary widely across those devices. A newer phone with better focus and image processing may produce a more useful photograph than an older handset, even when both can run the application.
Build a repeatable capture routine
Experienced users will get more value by repeating the same setup each time. I would choose a neutral background, keep the rack at a similar distance from the camera, and place the phone at roughly the same height as the antlers. This creates a more consistent basis for comparing different racks. It does not eliminate estimation error, but it reduces the number of variables that I control poorly.
I would record the circumstances around each image in a simple note: whether the rack was mounted or held, whether both sides were visible, and whether the photo was taken straight on or at an angle. That small habit helps explain why two photographs of the same rack might produce different impressions. It also prevents me from treating a single unusual result as a definitive conclusion.
Another useful check is to inspect the rack from the side after the initial estimate. A front-facing photo may show spread and symmetry but hide the true length or shape of a beam. A side view may reveal structure that the first image missed. I would use the first image for orientation, then decide whether a second angle adds information or merely introduces more perspective distortion.
The app should not be confused with a general hunting log, a wildlife identification tool, or a complete record-keeping system. Its identity is much narrower: it focuses on estimating antler scores from photographs. That narrow purpose is a strength when I want a quick rack assessment, but it means I would keep other notes and measurements elsewhere if I am maintaining a serious harvest record.
Faster patterns for real-world use
The quickest reliable pattern is not simply “take a picture and submit it.” It is “prepare, frame, inspect, then submit.” I would spend a few seconds making sure the rack is not tilted, the main features are visible, and the background is not competing with the antlers. That small pause is faster than repeating the process several times because the first image was unusable.
For a group of racks, I would process them one at a time and preserve the same orientation. This makes the results easier to compare. If one rack is photographed from a low angle and another from a straight-on position, the comparison says as much about the cameras as it does about the antlers. Consistency is particularly important when the scores are close and the goal is to decide which rack deserves manual attention first.
A practical shortcut is to use the app as a screening tool. If a rack appears clearly modest and the result matches that impression, I may stop there for casual purposes. If the rack looks unusually wide, tall, or symmetrical, I would move to a tape measure and a recognized scoring worksheet. This two-stage workflow saves time without pretending that the automated estimate has the same status as a formal measurement.
Another good pattern is to retake only when the reason is clear. If the first photo cuts off a tine, glare obscures the beam, or one side is hidden, a new image is justified. If the image is already clean and the score merely differs from what I hoped to see, taking endless pictures can become a way of chasing a preferred answer. The app works best when it informs judgment rather than replaces it.
For sharing with friends, I would send the photograph together with the app's estimate and a note that it is an image-based assessment. That wording keeps expectations realistic. It also makes discussions more productive, because people can focus on the rack itself instead of arguing over whether a phone-generated number should be treated as official.
Where the ordinary alternatives still win
A traditional tape, a printed scoring guide, or an experienced scorer remains the better option when accuracy matters. Manual scoring is slower, but it lets you physically locate each measurement, verify the points, and account for deductions with greater visibility. The app wins on convenience and speed; the manual method wins on control and explainability.
For a beginner, the app can be a gentle introduction to the language of antler scoring. It encourages attention to the overall structure and may help someone understand why beam length, tine dimensions, spread, and symmetry matter. However, I would still learn the underlying scoring method rather than depending on the app to teach every detail. A quick estimate is more useful when the user knows what the estimate is trying to represent.
A local expert is preferable when a rack is unusual, damaged, heavily irregular, or likely to be judged formally. Photographs can flatten details and hide deductions that are easier to identify in person. In those situations, the app may still be a conversation starter, but it should not be the final step.
Advanced limits that affect the result
The largest limitation is the gap between visual recognition and physical measurement. A camera can show the outline of an antler, but it does not automatically remove perspective problems. A point that appears long may be angled toward the lens, while a broad spread may look narrow when the rack is rotated. These effects can influence an estimate even when the photograph looks acceptable at first glance.
Symmetry creates another challenge. A front image may make both sides appear balanced while hiding differences in beam curvature or tine length. Those differences matter in Boone & Crockett-style scoring, especially when deductions are involved. I would therefore treat a symmetrical-looking photograph as a useful overview, not as evidence that the rack will score evenly on both sides.
Occlusion is an obvious but easy-to-forget problem. If a tine is behind another tine, the software may not interpret it the way a person examining the physical rack would. The same applies to dark backgrounds, camouflage, foliage, deep shadows, and mounts that cover the base of the antlers. When a feature is important, I would make it visible instead of expecting the app to infer it.
There is also a human tendency to trust a precise-looking output. A number displayed on a screen can feel more authoritative than a rough visual opinion, even when both are based on incomplete evidence. I think the healthiest approach is to ask whether the photograph supports that level of confidence. If it does not, the number should remain a convenient estimate.
The app's average rating is 3.2 from roughly sixty-five ratings, with around sixteen written reviews, and it has passed ten thousand installs. Those figures suggest a modest user base and a mixed reception rather than a universally established scoring standard. I would read that as a reason to test the workflow personally and judge whether it fits my needs, not as a reason to dismiss it outright.
The developer is rackline.ai, and the app sits in the sports category rather than presenting itself as a full professional scoring service. That positioning makes sense to me. It is a focused utility for quick analysis, and its value depends heavily on how carefully the user supplies the photograph. People expecting a complete replacement for experienced scoring should choose a more hands-on alternative.
Who should skip it
I would skip this app if I needed a certified score, a defensible record-book submission, or a measurement process that I could audit line by line. I would also look elsewhere if I wanted detailed education about every scoring rule, a comprehensive hunting journal, or a social community built around comparing harvests. Those needs go beyond a photo-based estimate.
It may also be a poor fit for someone who usually takes quick, angled phone pictures and does not want to adjust the setup. The app cannot make an obscured rack fully visible. If the user is unwilling to retake a photograph or perform a manual check, the convenience may not compensate for the uncertainty.
On the other hand, I think it suits casual hunters, beginners learning to look at rack structure, and experienced users who want a fast screening step. It can be especially handy when several racks need an initial comparison before deciding which one deserves a full measurement session. The key is to use it as part of a workflow, not as the entire workflow.
My verdict after using it as a scoring companion
I see rackline.ai as a useful specialist tool with a clearly defined role. It makes the first look at a deer rack quicker and more approachable, particularly when I want an estimate from a photograph instead of beginning with a full manual scoring process. The free entry point also makes experimentation easy, although I would examine the in-app purchase choices carefully before spending anything.
Its strongest quality is the way it shortens the distance between curiosity and action. A photograph can prompt me to inspect a rack more carefully, compare it with another, or decide whether a formal score is worth the effort. That is meaningful value for a sports app, even if the result is not suitable for official use.
Its main weakness is equally clear: the estimate is only as dependable as the image and the interpretation of what the image shows. Perspective, shadows, hidden points, and asymmetry can all weaken confidence. The app does not remove the need for judgment; it rewards users who apply judgment before and after the scan.
My recommendation is simple: use it for speed, screening, and learning, then switch to physical measurements when the score truly matters. If that balance matches what you want, the app is worth trying. If you need formal precision or a complete scoring education, a tape measure and an experienced scorer remain the better choice.
rackline.ai - AI Deer Scoring Frequently Asked Questions
What does rackline.ai cost, and are there purchases inside the app?
rackline.ai is free to download, with optional in-app purchases ranging from $4.99 to $499.99 per item. The free download does not necessarily mean every tool or level of use is free, so check the purchase details shown in the app before confirming a transaction. This is especially helpful if you plan to use AI analysis regularly or explore features beyond the initial download.
Is rackline.ai suitable for beginners who have never scored a deer rack?
Yes. The app is intended to make antler assessment more approachable by analyzing a photograph and offering an estimated Boone & Crockett score. A first-time user can use that result as a starting point for understanding a rack, rather than needing to make every measurement unaided. Treat the output as a reference, though: learning accepted scoring standards and seeking guidance from an experienced scorer remain important for formal evaluations.
What is rackline.ai – AI Deer Scoring used for?
rackline.ai – AI Deer Scoring is designed to help hunters and wildlife enthusiasts evaluate deer antlers from photographs. The app uses artificial intelligence to analyze an uploaded image and provide an estimated score or structured assessment based on visible antler characteristics. It can be useful for quickly organizing observations, comparing animals, and getting a preliminary reference before consulting an experienced scorer.
How accurate is the AI deer scoring result?
The result should be treated as an estimate rather than an official measurement. Accuracy can depend on image quality, lighting, camera angle, antler visibility, distance, and whether parts of the rack are hidden. A clear, well-framed side or front image will generally produce more useful feedback. For records, competitions, hunting regulations, or trophy certification, users should still rely on a qualified human scorer and accepted scoring standards.
What kind of photos should I upload for the best analysis?
For the most reliable analysis, use a sharp, well-lit photo in which the entire antler rack is visible and not blocked by branches, hands, heavy shadows, or other objects. Keep the deer or mount centered, avoid extreme angles, and make sure the antlers are large enough in the frame for the app to identify their features. If the application allows multiple images, additional views may help provide better context.
Pros
- Fast AI-assisted scoring for deer photos and field observations.
- Helps standardize trophy evaluations across different users.
- Useful reference for hunters learning antler scoring basics.
- Photo-based workflow can reduce manual measuring and calculation errors.
- Convenient mobile access for reviewing scores while outdoors.
Cons
- AI results may be inaccurate with poor angles
- lighting
- or obstructed antlers.
- Requires suitable photos and may not replace official scoring methods.
- Some advanced features or usage limits may depend on a paid plan.
- Outdoor use can be difficult without a reliable internet connection.
- Results may vary from expert assessments
- especially for unusual racks.
- Category
- Sports
- Version
- 3.0.28